
Worried about failing payroll compliance and forced to pay hefty fines? Or maybe it is clear to you that the current payroll system you are using is just not optimized to satisfy your business needs. Whichever the reason, try PayrollNinja – your key to payroll optimization in Malaysia. Claim your 30-day free trial to get started!
Here’s how you get started with payroll optimization at your organization:
To help you browse this article better, here are the topics listed here:
SIGN UP
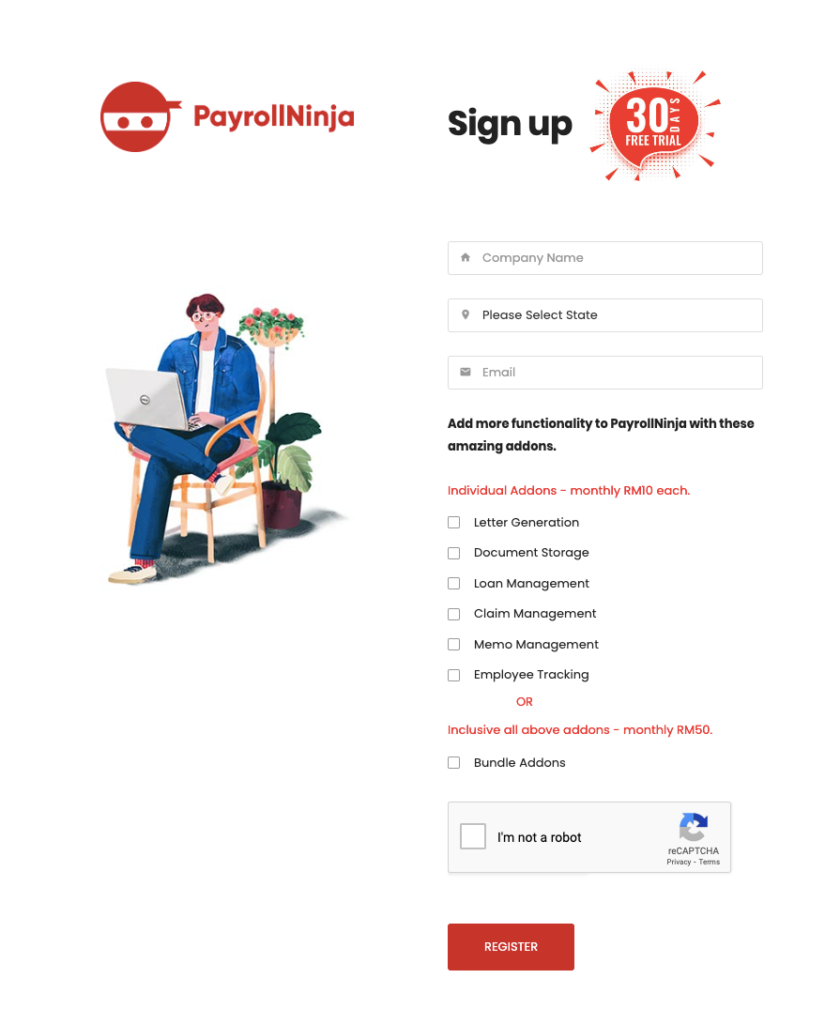
- Visit the Sign Up page
- Fill out Company Name, State, and Email. Choose the plan of your choice, and click Next.
- Answer Yes/No, if you use fingerprint device. Tick “I’m not a robot” box and register.
- Account will be created and then you will receive an email with login details.
LOGIN
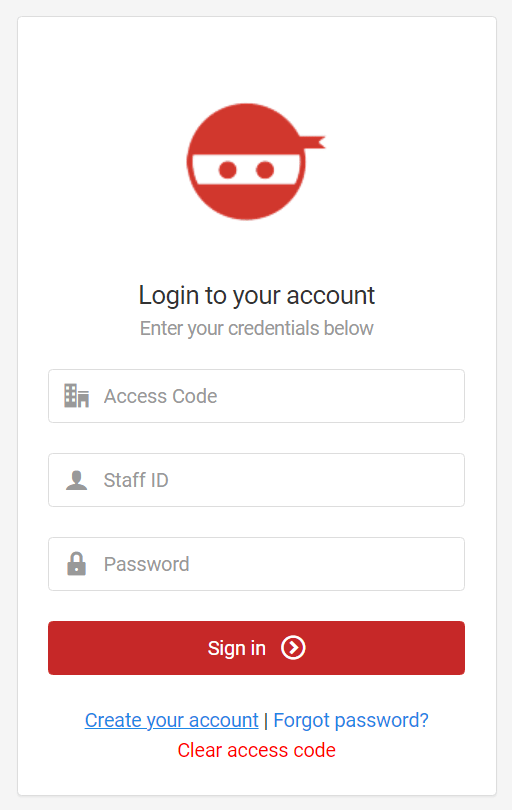
- Open the Login page.
- Fill out Access Code, Staff ID, and Password. Click on the Sign In button.
- Access code is required to be entered only once. If wrong access code is entered by mistake, click on “Clear access code” link.
- If you have forgotten your password, click on the “Forgot Password” link. Alternately, you can click on “Create your account” link to sign up for a new account.
SETTINGS
The Settings module mainly consists of Record Listing with Edit icon (Blue) and Delete icon (Red). At the top right, you can see “Add New” Button to create a new record.
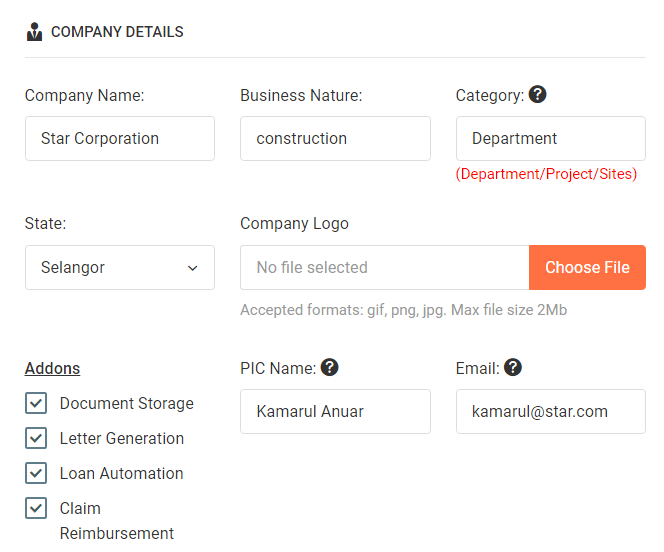
- Some fields are pre-filled with information collected during signup. E.g, company name, state and email.
- You can fill out the remaining information. E.g, business nature, etc.
- You may also upload your company logo for a more personalised appearance.
- Choose the Category used for categorisation of employee within your organisation. E.g, Department, Project/Sites.
- The Addons applicable are listed as per your plan. It represent HR modules which you can turn off, if not required for your organisation.
You can set the netpay values to be rounded off to the nearest cents, as per your preference.
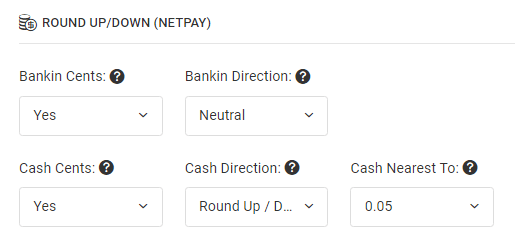
- “Bankin Cents” and “Cash Cents” is to decide if cents should be displayed during payout.
- “Bankin Directions” and “Cash Directions” is to set the cents as “Neutral” (as it is) or “Round Up / Down” to rounding to nearest cents.
- “Bankin Nearest To” and “Cash Nearest To” is to set rounding to nearest 0.05 or 0.5 cents.
DEPARTMENT
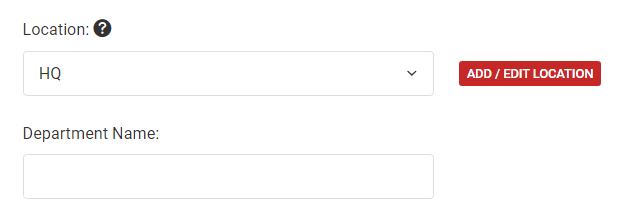
- Category is set as “Department” by default on signup.
- System categorisation consists of 2 tier. You may decide on the scenario that suits your organisation.
- Scenario 1 (Location: State & Category: Project/Sites)
- Scenario 2 (Location: HQ/Branches & Category: Department)
- To create Location, click at “Add/Edit Location” button and popup will appear. Click on “Add New” and Submit form.
- To create Category, choose location and fill up category name.
POSITION
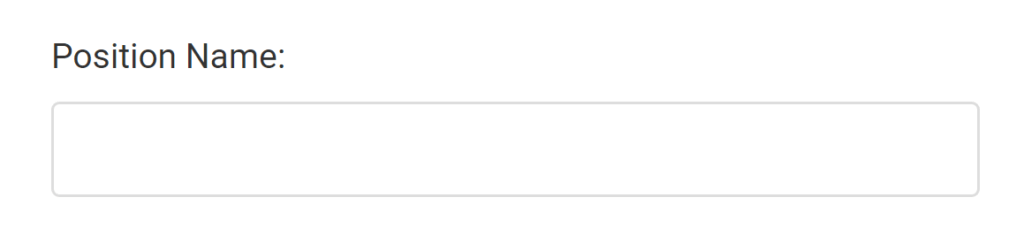
- Upon signup, default positions are created automatically.
- To add more positions, click on “Add New” and fill up Position Name.
STAFF ID
Usually, system generated staffID format is enough to start using the payroll system. However, if you’ve decided to generate multiple staffID format and assign the same based on location, click on “Add New” button.
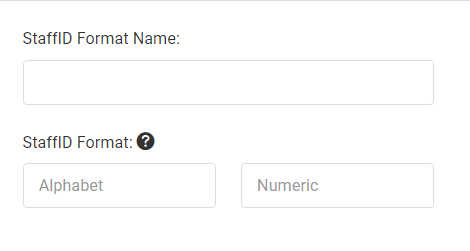
- Fill out the StaffID Format Name to identify.
- “Alphabet” is fixed text at beginning of format. E.g, ABC.
- “Numeric” is running number digit. E.g, 0000 represent 4 digit.
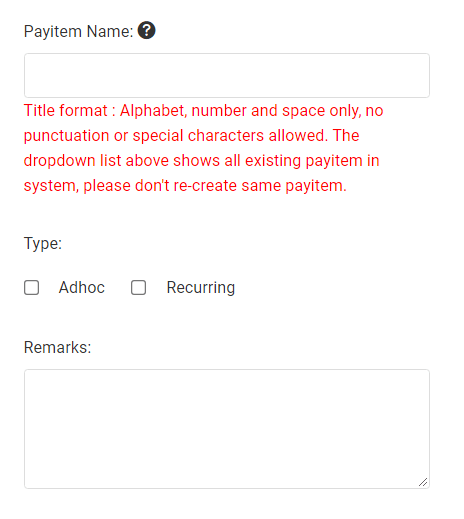
PAYITEM EARNING
During signup, PayrollNinja system creates default payitem earnings (Allowances). However if you need to create custom allowances, you may do so as well.
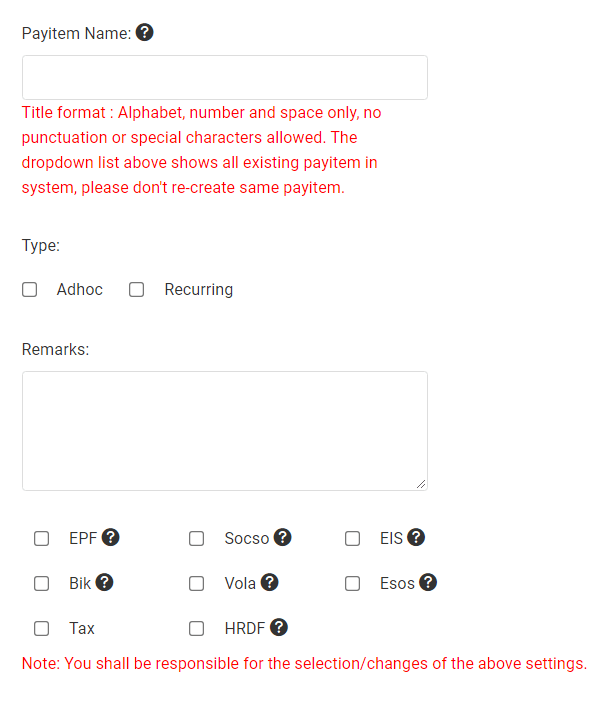
- Fill up payitem name and tick the type:
- Recurring type is for allowance that keep repeating every month
- Adhoc type is for allowance that is assigned by cases.
- Fill up remarks or description.
- Tick the nature of allowances. E.g, if this allowance should contribute to EPF, please tick EPF box.
PAYITEM DEDUCTION
During signup, system creates default payitem deduction (Deductions). However, if you need to create custom deduction, you may do so.
- Fill out the Payitem name and tick the type.
- Recurring type is for deduction that will keep repeating every month
- Adhoc type is for deduction that is assigned by case.
- Fill up remarks or description.
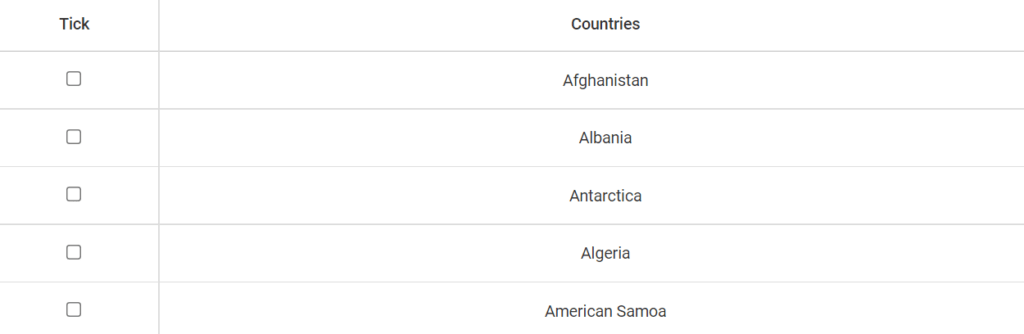
COUNTRIES
Select the Country based on the nationality of the employees in your organisation. Click Submit.
BANK
You need to key-in company bank account for payment purposes.
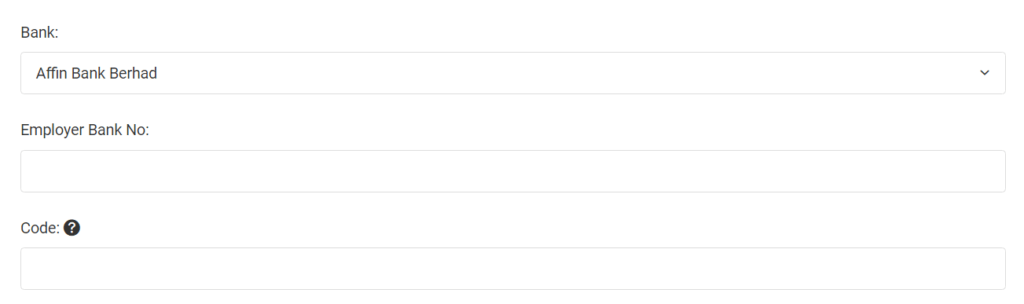
- Select company bank from the dropdown.
- Fill out the bank account no.
- If bank has given additional unique code, please fill out that as well.
REPORT INFORMATION
Report information required for display in statutory reports.
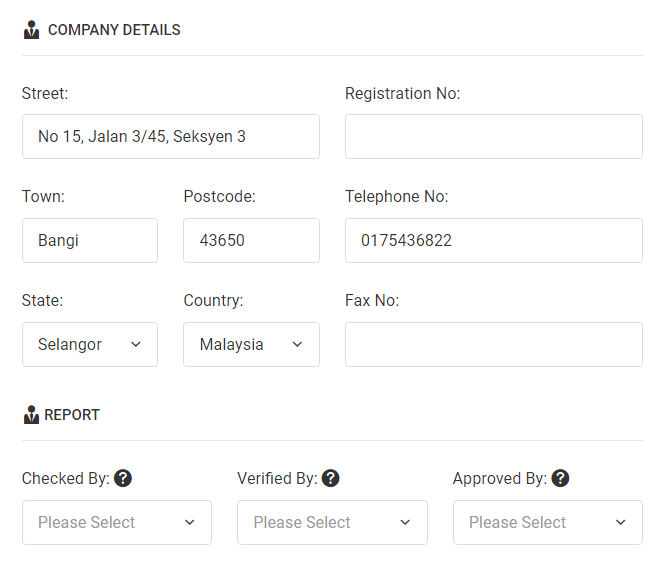
- Fill out Company Street, Town, Postcode, State and Country.
- Next, fill out Company Registration no., Telephone no. and Fax no.
- In the Report section, select the Checked By, Verified By and Approved By to make the information appear at the bottom of the internal reports. Please leave blank, if this section not required.
Please note that In order to be able to select respective employee as mentioned above, you need to create employee records at employee overview first.
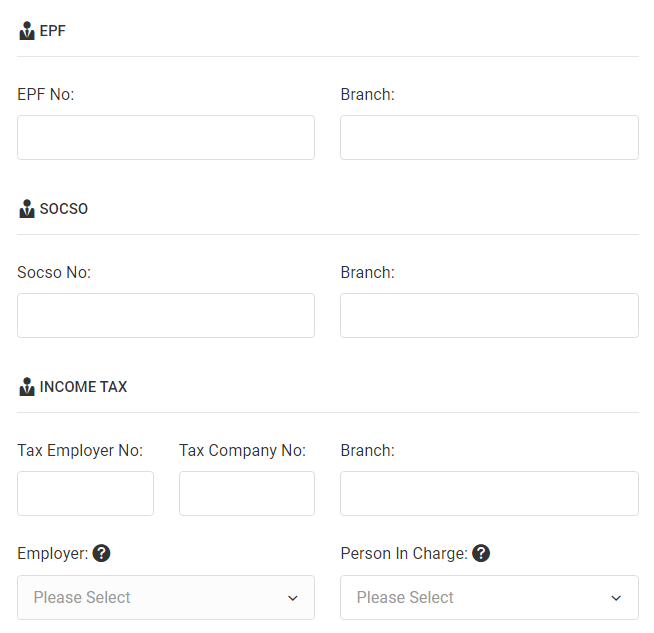
This information is required for display in statutory reports. Please fill up accordingly.
- Tax employer no. is related to company owner, while tax company no. related to company.
- Please select employer (owner) and Person In Charge (HR).
LEAVE
Leave is set by position. You may set up your employee’s leave options based on their position.
Leaves are broken down into Annual Leave, Sick Leave as well as Maternity and Paternity Leave. The number of leaves entitled are based on your company.
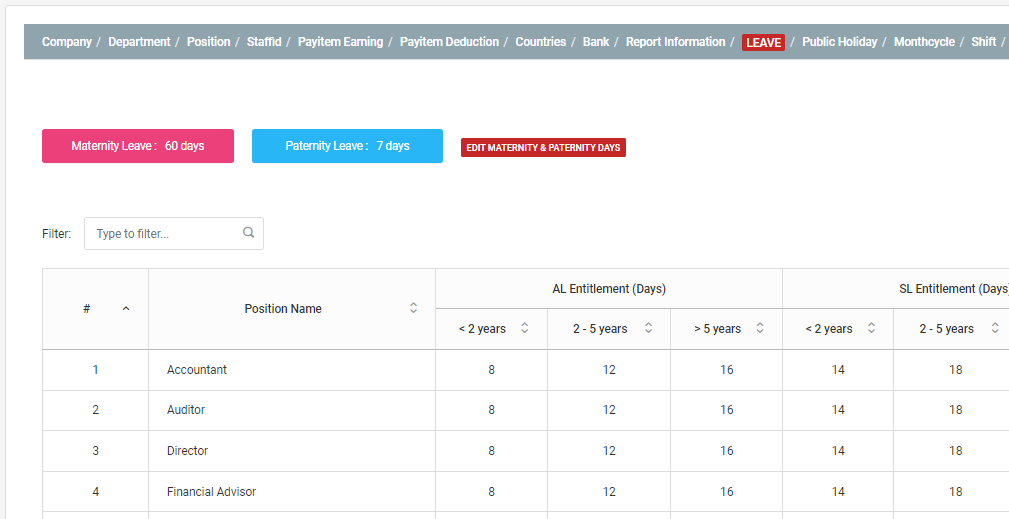
To add more leaves, click on “Add New Position”.
Click on “Add New Position” to add new position. Once the position is created, it will be listed in Leave tab.
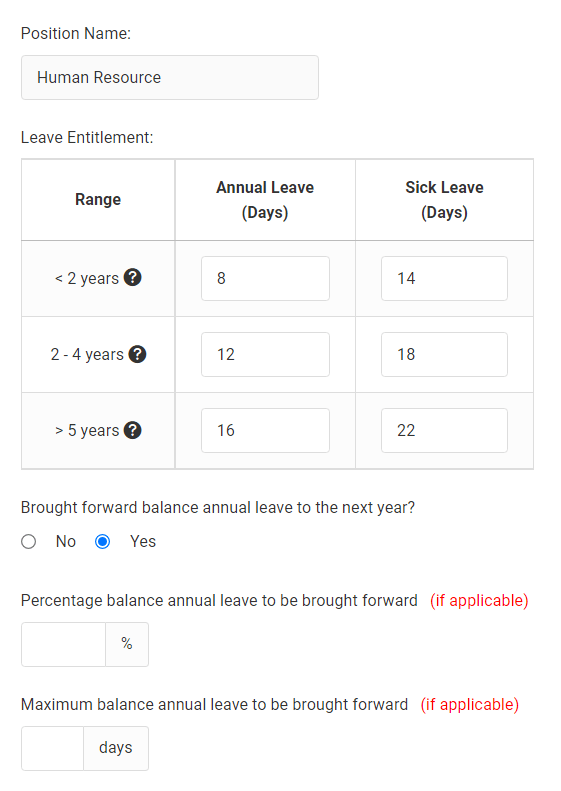
- Click on edit icon (blue) to edit default values. You may set leave entitlement for Annual Leave (AL) and Sick Leave (SL) based on company policy.
- For “Brought forward balance annual leave to the next year”, please tick yes to carry forward unused AL.
- You can set allowed percentage leaves to be brought forward and further narrow down to maximum no. of days. E.g, 50% AL brought forward equivalent to 12 days and maximum leaves set at 10 days. Therefore only 10 days leave allowed to be brought forward.
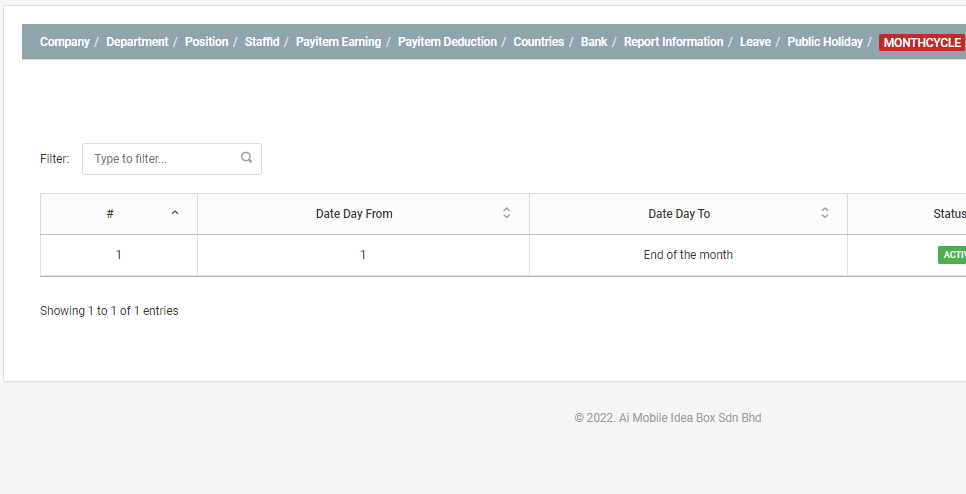
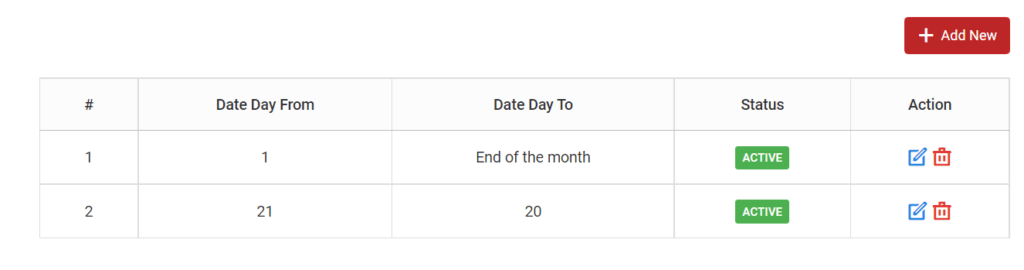
MONTH CYCLE
Also known as cut off date for your company.
Click on “Add New”, set the dates and click “Submit Form”.
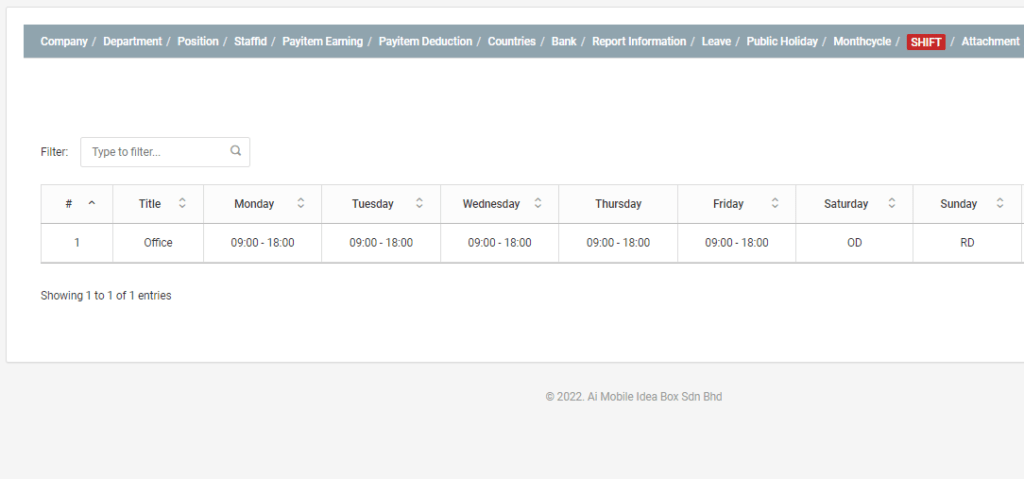
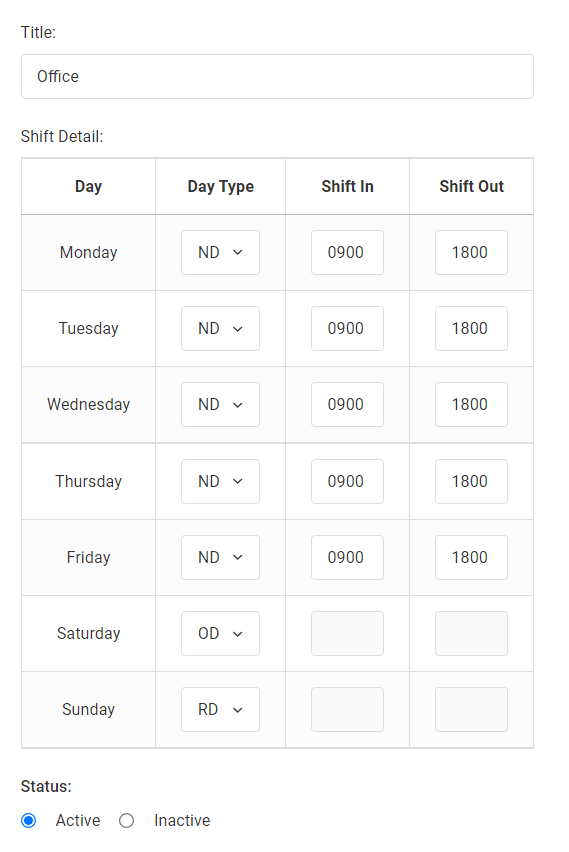
SHIFT
This is where you set up your employees work schedule.
If your organisation has multiple shifts, all you need to do is click on “Add New” and fill in the shift details.
Then click “Submit Form”. You may add as many shifts as required.
PUBLIC HOLIDAY
By default, PayrollNinja system will give you generic public holiday based on current year and state selected. You may delete non-applicable public holidays.
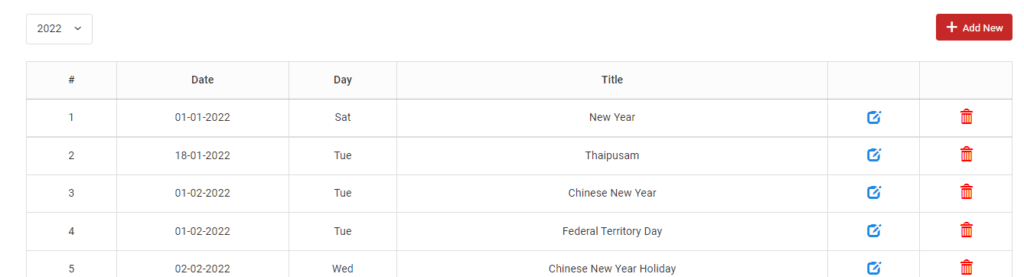
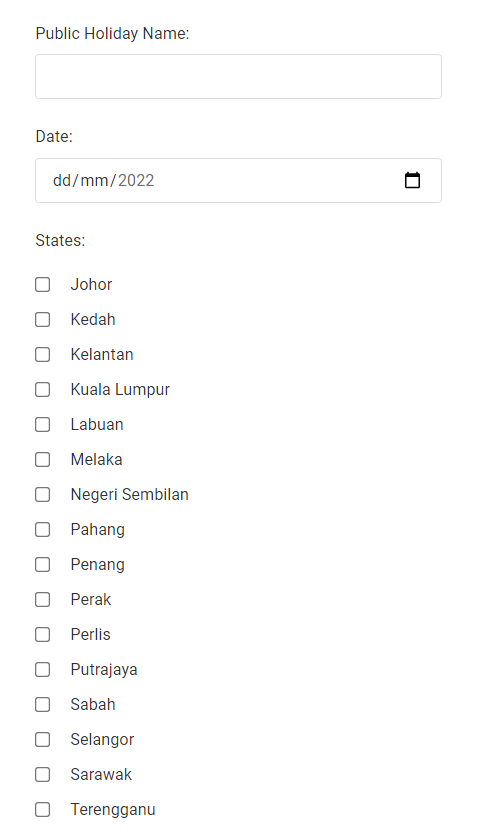
To add new public holiday, please click on “Add New”. Fill up Public holiday name, date and states the holiday applicable for.
ATTACHMENT
Attachment or document storage is to store files related to employees. You may create new category attachment by filling up attachment name.

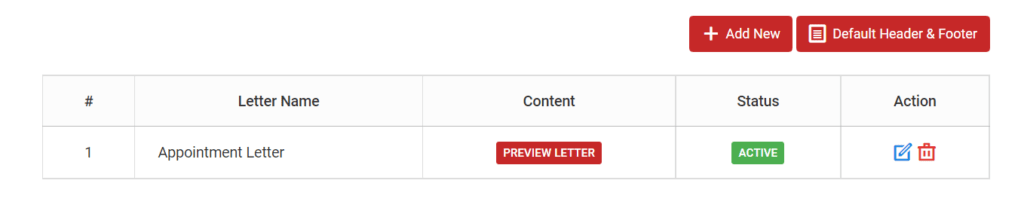
LETTER
Letter can be used to generate letter related to employee on the fly. The “Preview letter” button will show the preview of content that you’ve entered earlier.
If your letter needs header and footer, click on “Default header and Footer” button to set the content.
- At header, you may set your logo and company address.
- At footer, tick to show page number in every page.

To create a new letter, click on “Add New” button.
- Fill up letter name and start creating content using the editor, similar to Microsoft Word.
- Click on the variable button to open up a popup. You may select dynamic variable by clicking on it, and it will be auto inserted automatically.
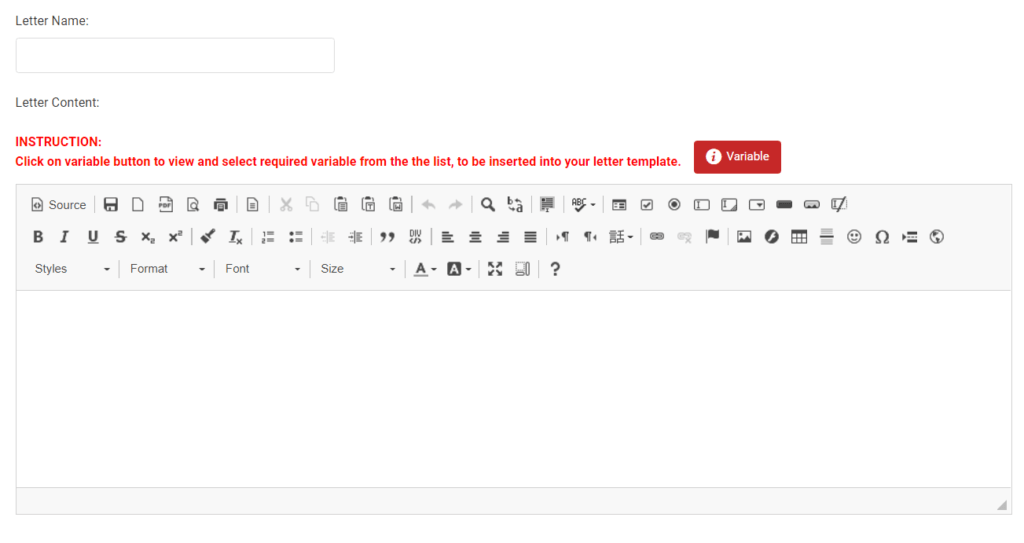
Dynamic variable is information related to employee pull from data library (database)
APPROVAL
Approval is where leave approval workflows are set. Approval type consist of Leave approval, Claim approval, and Other approval.
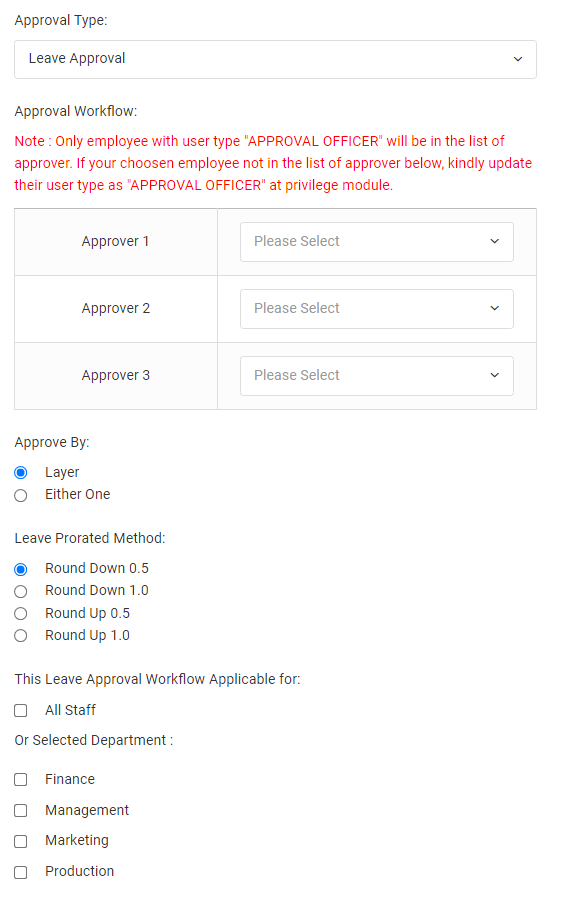
You can set approver by choosing employee name from dropdown. Only those employees with user type “APPROVAL OFFICER” will be listed here. To change user type, you need to go to privileges module.
Approve By has 2 values – “Layer” and “Either One”. “Layer” will require approval by stages, while “Either One” requires only one of the approver. For “Claim Approval” and “Other Approval”, only “Either One” option are available.
Leave prorated method will be used when employee joined work or employee stop from work (resigned, terminated, absconded & etc.). You may choose to round up/down to nearest 0.5 or 1.0. [Leave approval only]
Finally, you can define this approval workflow to be applicable for All staff or by department. [Leave approval only]
EMPLOYEE OVERVIEW
This screen shows overview of department and total employees in each. You can view by all or by department.
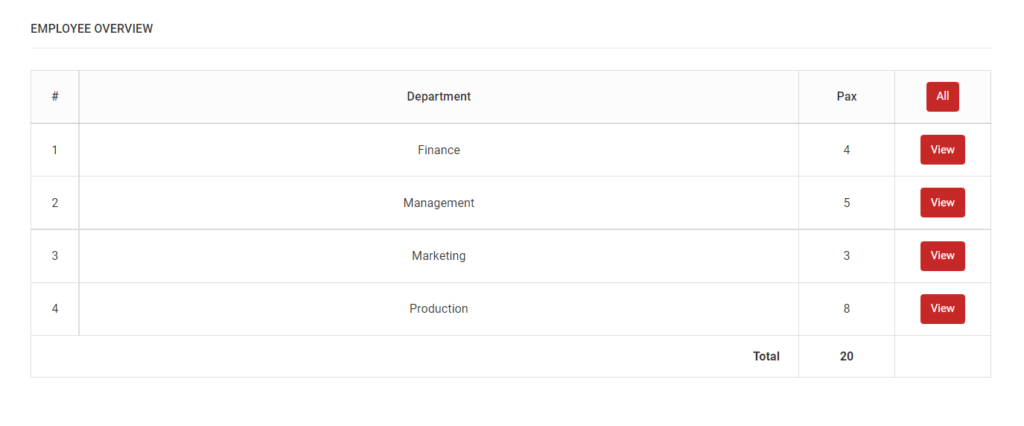
Next you’ll see employee listing where detailed listing of employees will be shown.
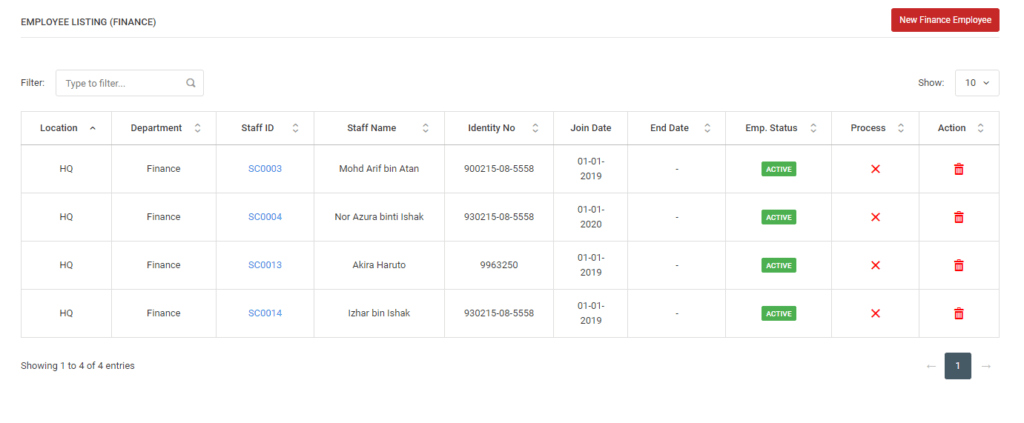
You can search using the Filter, and click staffID to view more detailed information of each employee.
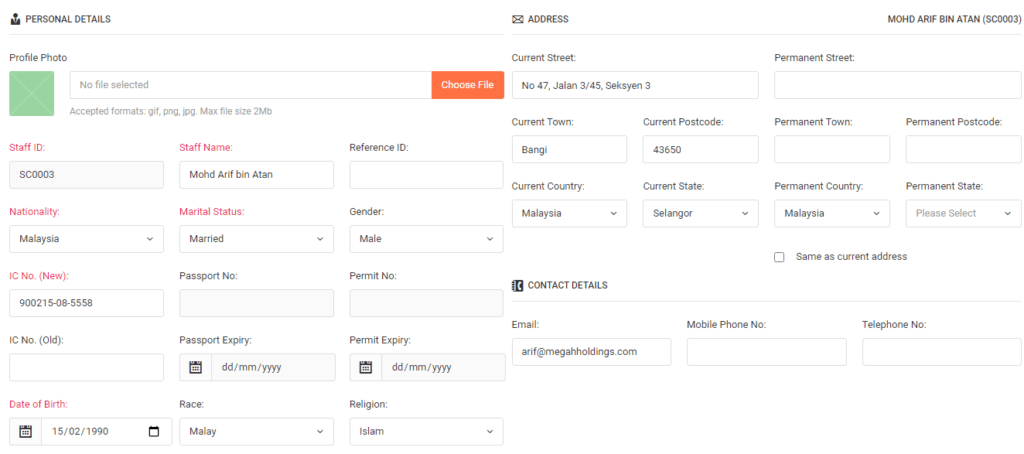
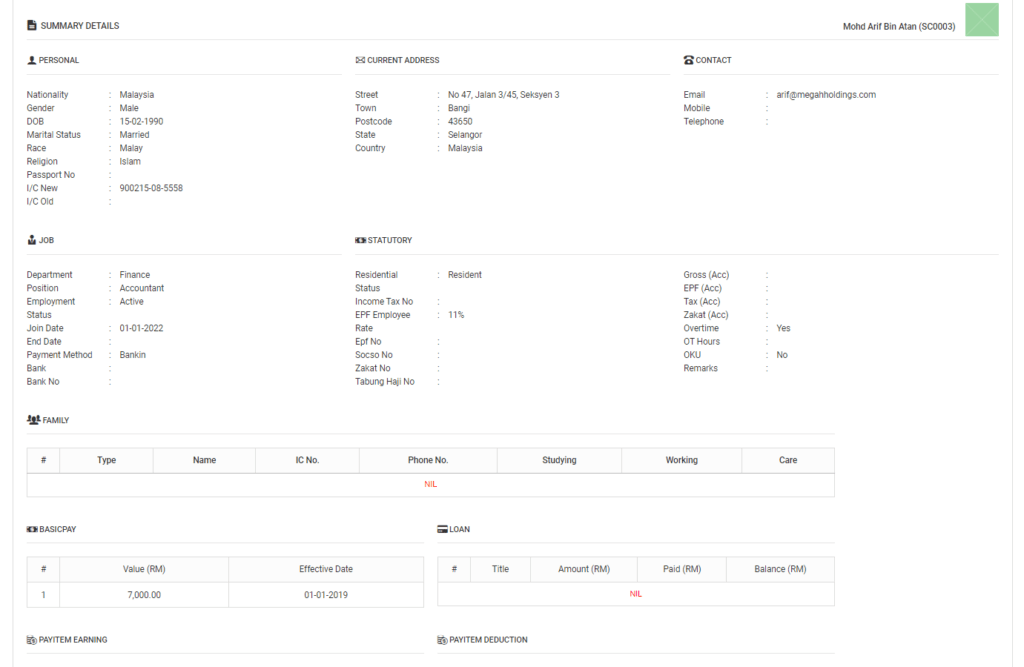
PERSONAL
For personal details, you may upload a profile photo and enter employee related personal information. Field with pink color indicates compulsory field.
For address, you may enter current address and permanent address. In the event of same address, you may fill up current address and tick “same as current address”.
Finally, it is the contact details (email, mobile no. and tel. no) of selected employee.
JOB
When a new employee joins the company, you’re a required to enter the basic pay, department, position, employment status, and join date. On the other hand, when a employee resigns, you may update at employment status and end date.
Click on gear icon to key-in basic pay and a popup will open. You will also be able to view revision of basic pay.
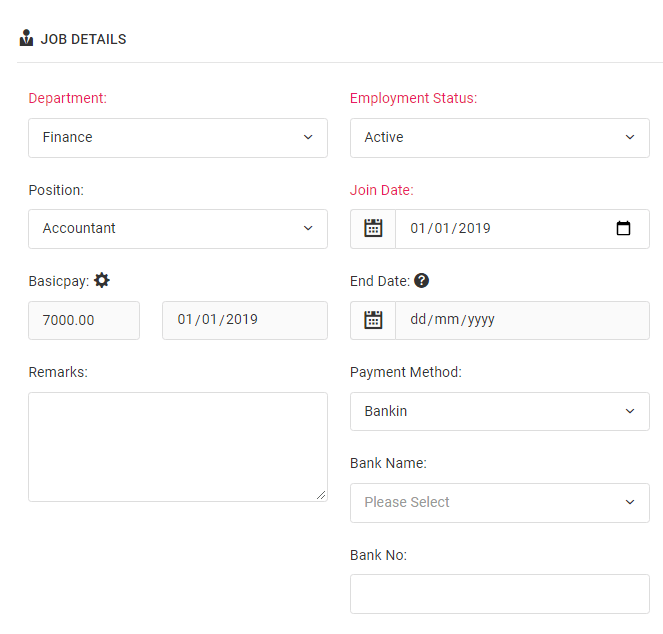
Remarks can be used to enter some notes related to employee. Payment method and bank details are required during salary payout.
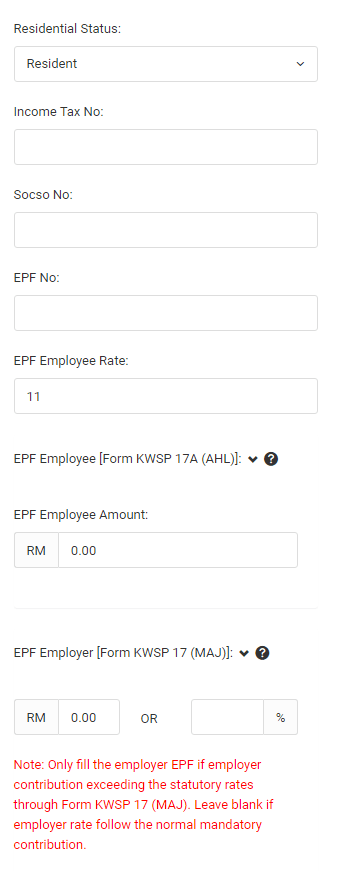
All above field are necessary for statutory contribution.
- Choose “Residential Status” for tax computation purpose.
- EPF employee rate (Normal) can be set to any percentage, the usual is 9% or 11%. For special cases where employee decides to contribute as fixed amount, you need to click on down arrow.
- Similarly for employer, you can set whether to contribute by percentage or fixed amount.
- Income tax no., SOCSO no., EPF no., ZAKAT no. and TABUNG Haji no. are the unique account numbers given during statutory account registration physically at respective branches.
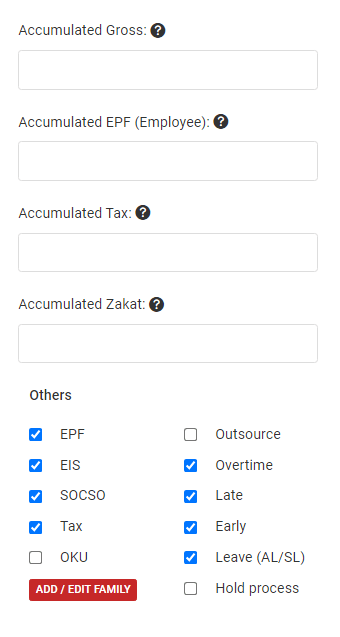
Accumulated values can be optional. However in order to obtain accurate MTD computation, this info are required.
Default OT hour is the maximum OT hour per month that this employee should work. This value will be auto copied to process module.
Checkboxes at “Others” section will give you flexibility to include or exclude features:
- Statutory contribution
- EPF (Tick to enable and untick to disable EPF contribution)
- EIS (Tick to enable and untick to disable EIS contribution)
- SOCSO (Tick to enable and untick to disable SOCSO contribution)
- TAX (Tick to enable and untick to disable TAX contribution)
The above are overriding method of standard contributions and very useful for foreign labours.
- OKU (disabled) will give employee extra rebate during MTD computation
- Outsource for labelling purpose of external manpower.
- Overtime if this employee has overtime hours.
- Leave (AL/SL) if this employee eligible for leave entitlement.
- Hold process to hold active employee for current month. E.g, long vacation.
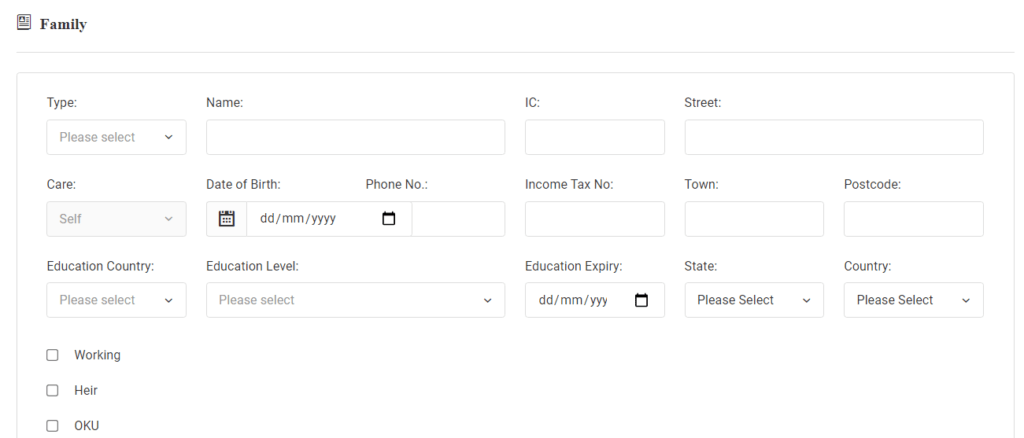
- Add/Edit Family will open a popup when clicked. In the form, you may choose type as spouse or children.
- Select Care if children is under your care (responsibility) and you’re claiming for the rebate.
- If spouse or children is studying, select education country, education level and education expiry.
- “Working” and “OKU” is applicable for spouse and children while “Heir” is only for children.
PAYITEM RECURRING
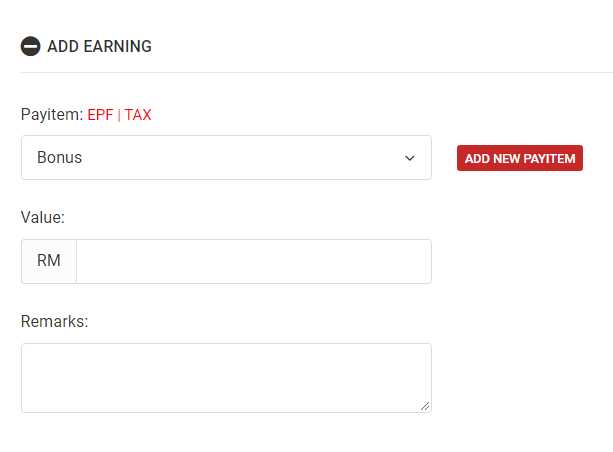
Payitem recurring is earning (allowance) or deduction that will be repeated every month by just entering once.
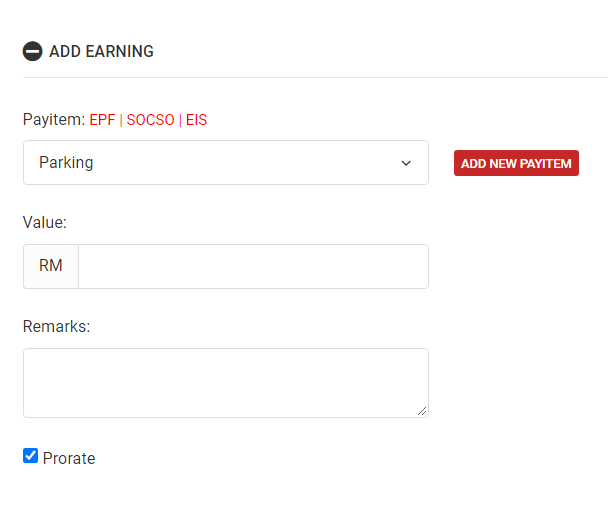
- Select payitem and enter value. Remarks can be optional.
- Prorate tick means when leave is taken, this payitem will be prorate the amount accordingly based on employee attendance or else employee will receive full amount.
- Hold payitem is to exclude payitem from current month salary processing.This option will only be visible during edit form.
- Next is payitem title – it will display the nature of payitem. E.g, Petrol is taxable.
- You can also create new payitem by clicking on add new payitem label. Popup will appear.
- Payitem deduction form looks similar except no “Prorate” checkbox.
PAYITEM ADHOC
Payitem adhoc is earning (allowance) or deduction that only required for current month. It will not be repeated again for next month.
Everything is similar to payroll recurring form, except no prorate and hold payitem option are available here.
LOAN
Loan module lets you manage loan taken by employee from employer. Select the type of loan (Company loan, Housing loan, Car loan, Education loan, Personal loan).
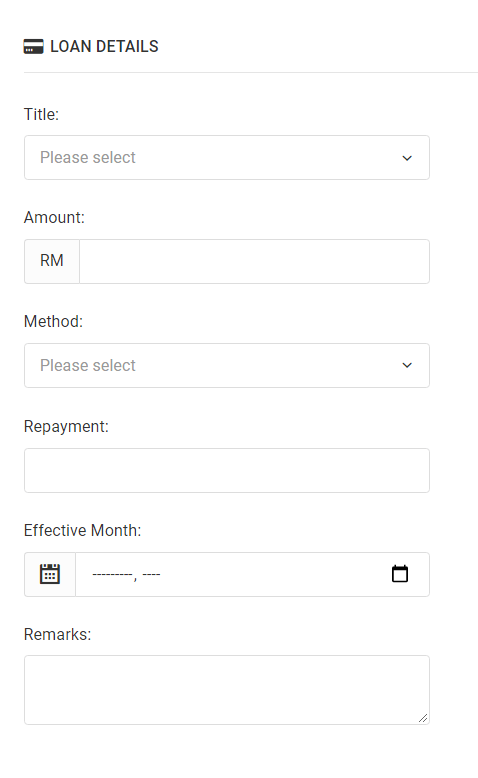
- Enter total loan amount, followed by method. (Fixed or month). Fixed means fixed amount of repayment value, and month means duration of month to payback entire loan amount. Upon choosing month, month field will be visible where you need to key in the month and repayment value will be auto calculated.
- Set effective month as repayment starting month. Remarks can be optional.
- “Hold” checkbox is to exclude repayment deduction for the current month.
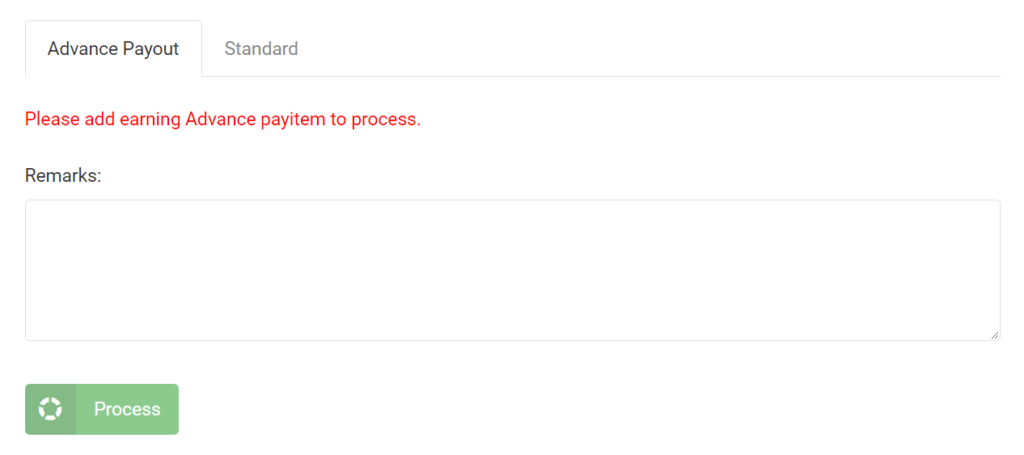
PROCESS
Advance process is when employer give advance to employee and deduct again in the same month. You may add payitem earning as recurring if advance will be repeated every month or as adhoc, if it’s one time. Upon clicking on the process button, advance payout will be processed and payslip will be ready to view.
Overtime section will only appear if you’ve ticked Others > Overtime checkbox at job module.
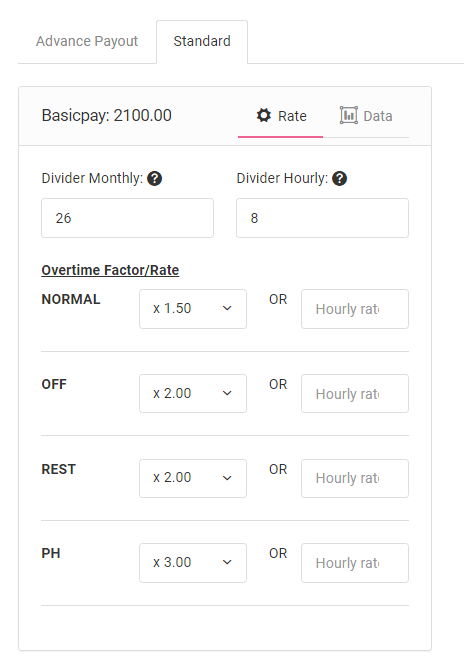
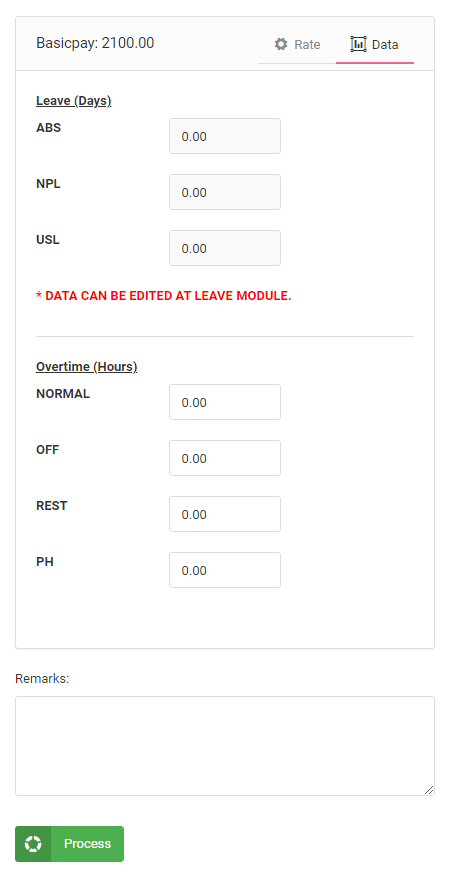
At Standard payout under Data tab, you only need to enter overtime hours, while leave details will be updated from Leave module.
At Standard payout under Rate tab, you need to enter how salary is being divided by monthly and hourly. As for overtime factor/rate, you can choose factor x1.5, x2.0 or x3.0 or set hourly rate. The rate details only need to be entered once, and will be repeated for next month.
PAYSLIP
You able to view payslip after you process employee salary.
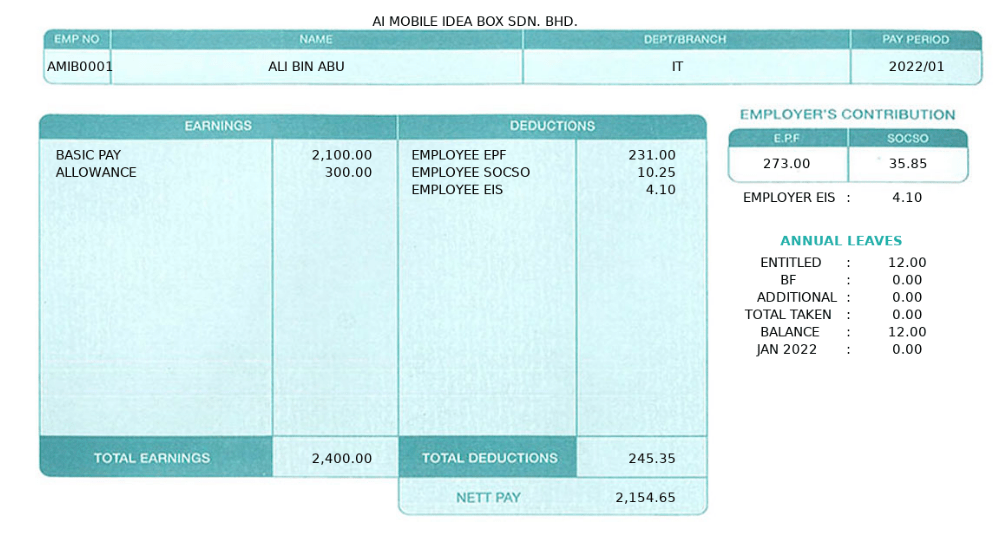
In Payslip module, StaffID, Staff Name, Department, Pay Period will be shown at top row, Earnings (Allowance) on left column and Deductions on the right column. Further to right will be the Employers Statutory Contribution, below which will be the Employee Annual Leave details.
You may click on download button to download in PDF format and then print. Additionally, you may click on copy checkbox to duplicate the payslip in single page – one copy for employee and another for employer record.
PRIVILEGE
You can set different user type for each employee based on their privileges. Management will have access to dashboard (payroll summary and comparison). Approval officer access can be set flexibly by modules, departments and reports.
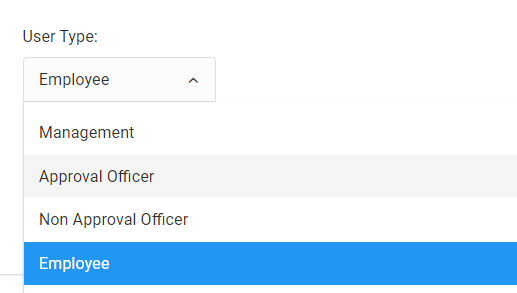
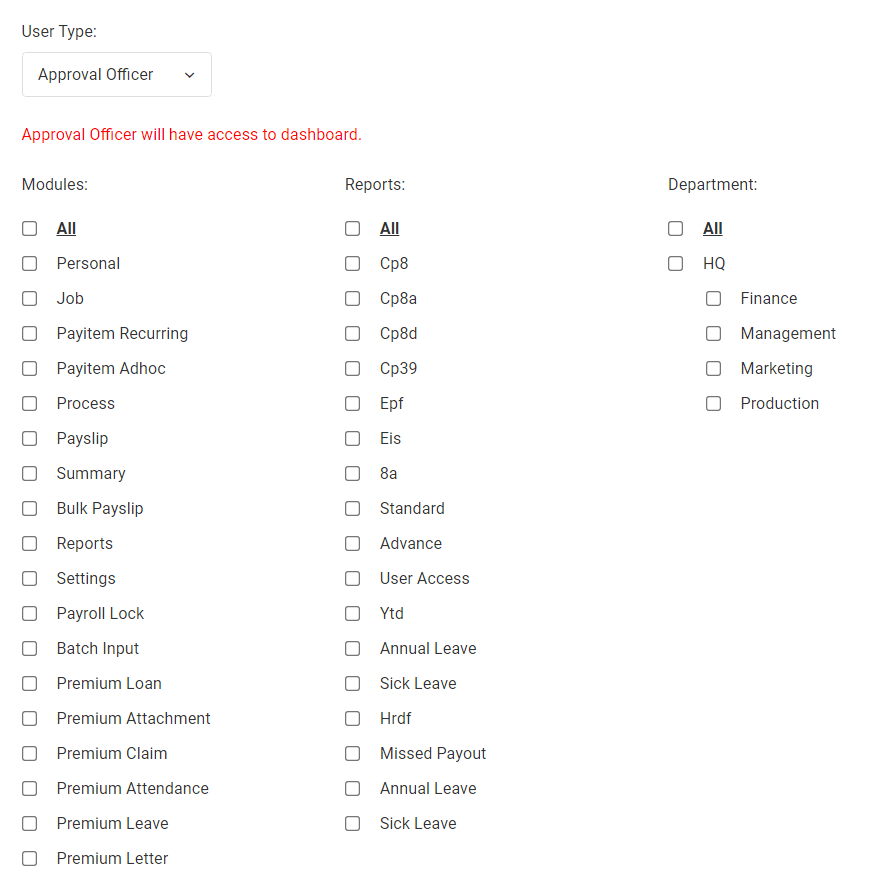
Non-approval office is similar to approval officer. However, the main difference is non-approval officer can’t approve leaves.
Employee will have access to employee self service (ESS) where they’re able to view payslip, apply leave and submit claim.
SUMMARY
You obtain overall summary of each employee with latest updated information in this module.
Upon clicking on the print button, you may print directly.
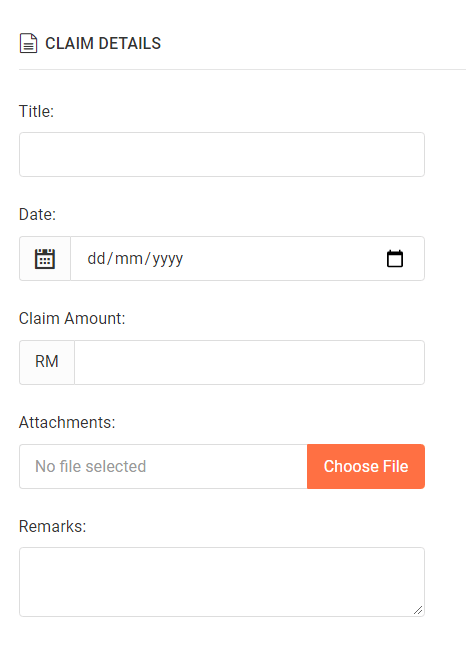
CLAIM
You may submit claim by filling up this form. Enter title and set claim date. Then enter the claim amount.
You can also attach claim receipt for reference and key-in remarks. (Optional)
Upon submit, approver officer will be able to view at their dashboard for approval.
LEAVE
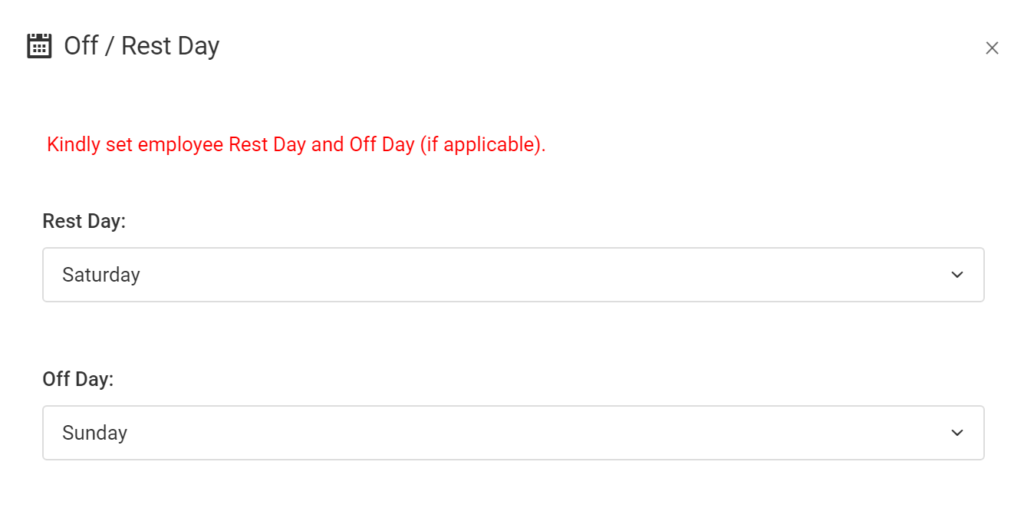
When off/rest day button is clicked, a popup will appear where you can set employee off day and rest day. These details are important during leave application.
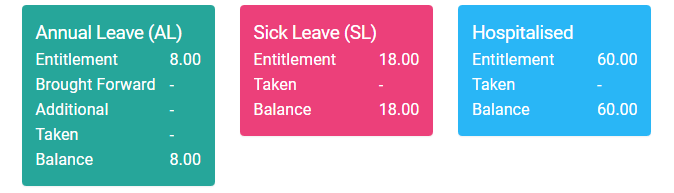
These 3 boxes shown above will display updated details of leave entitled, taken and balance.
- For AL, brought forward and additional leaves will shown too.
- Entitlement leave will be prorated for new employee joined and employee resigned, while fresh full entitlement will be given annually for existing employees.
- Entitlement for annual leave and sick leave can be set at Settings > Leave. While hospitalised, leave are fixed for 60 days.
- Unused annual leaves can be brought forward for next year. The behaviour can be set at Settings > Leave.
- Additional leave can be given when company decided to give leave instead of salary. E,g, Half day leave given for seminar conducted on non-working day.
- Taken shows no. of leaves already been used, while balance shows remaining leaves.
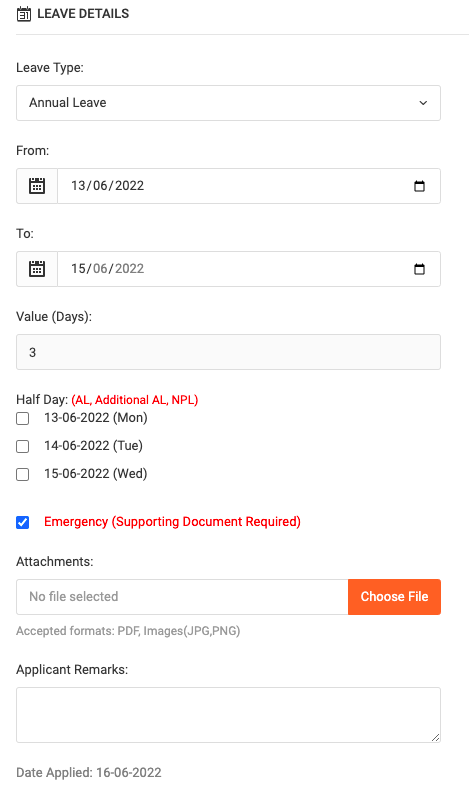
You can customize the Leave module to include half-days, as well as emergencies, in the following manner:
- Half-day: Only applicable for AL, Additional AL, NPL.
- Emergency: If selected leave date is before today. (Applying late)
- Clinic/Hospital: Only applicable for SL, Hospitalised.
To get started,
- First, select leave type (AL, SL, Hosp, Additional AL, ABS, NPL, USL).
- Then click on “Date from”, calendar will be shown. Choose a date and “Date to” and Value (days) will be auto filled in.
- Tick emergency checkbox to set selected leave as Emergency Leave (EL)
- Upload attachment as proof of leave taken. E.g, Medical certificate.
- Applicant remarks can be optional.
BATCH INPUT
Batch input is advanced module which makes the officer’s life easier and gets job done faster.
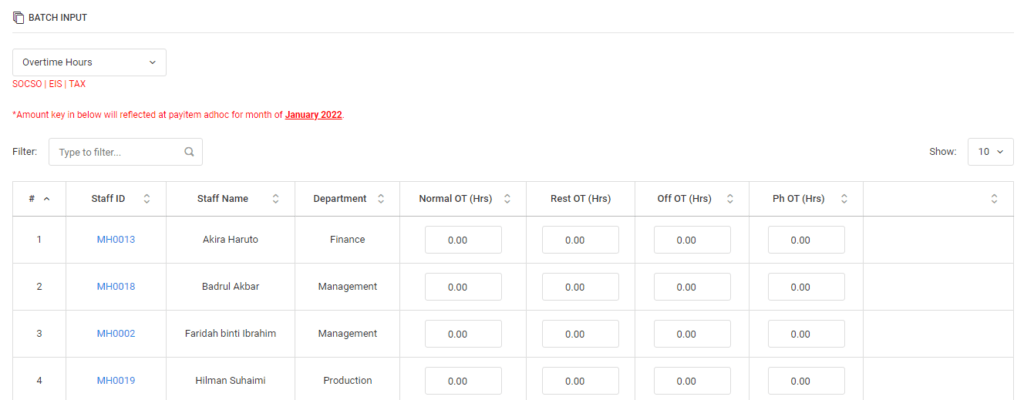
Select Earning (allowance) or Deduction payitem from the dropdown. Enter value directly in editable field (Normal OT, Rest OT, PH OT, Amount, Days).
BULK PAYSLIP
Bulk payslip is where you can download payslip of all employees in single PDF for easier printing.

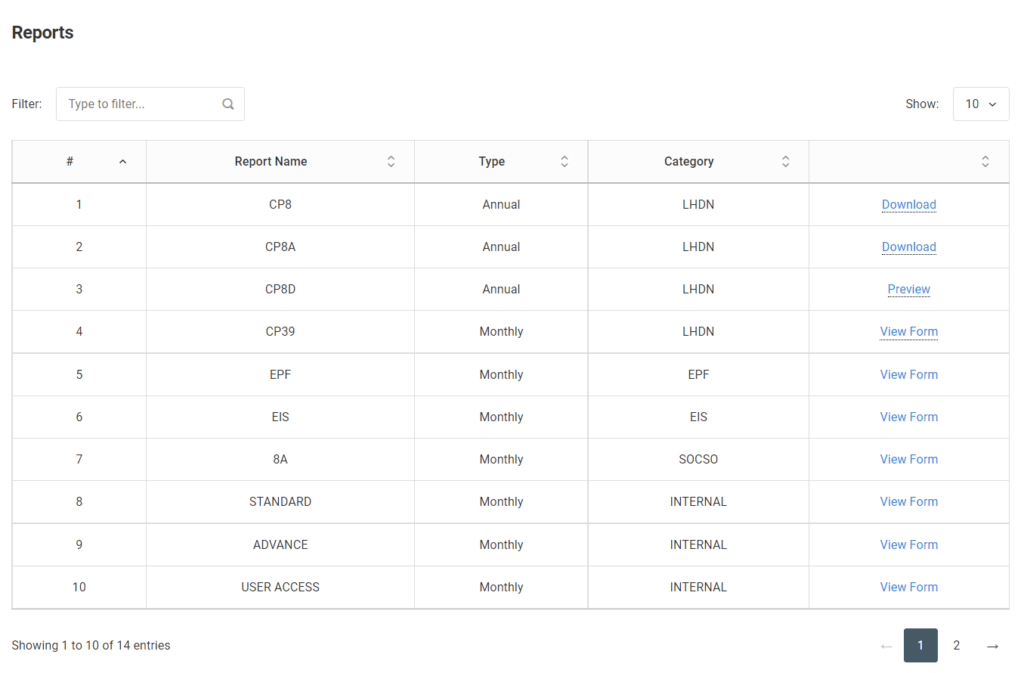
REPORTS
All statutory and internal reports are ready to be downloaded.
- LHDN (Form E, Form EA, CP8D, CP39)
- EPF (upload directly to EPF website)
- SOCSO (upload directly to SOCSO website)
- EIS (upload directly to EIS website)
- HRDF
- Internal reports (Advance report, Standard salary report, YTD report, Annual Leave report, Sick Leave report)
- User access report (Employee first time login can be retrieved from here)
- First click on reset button to reset current password.
- Click on copy button to copy and then paste anywhere E.g, Whatsapp, email)
- Click on email to send directly via email to employee. Email must be entered earlier at Personal module > Contact details > Email.
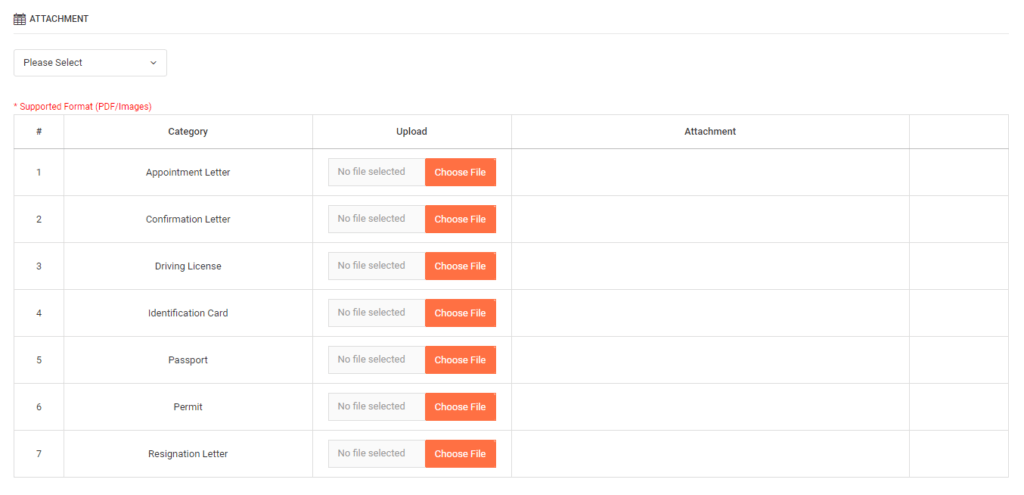
ATTACHMENT
Select an employee from the dropdown and list of attachment category will be shown. Upload document as usual for relevant category. Currently, PayrollNinja system supports PDF and images, upto 5MB in size.
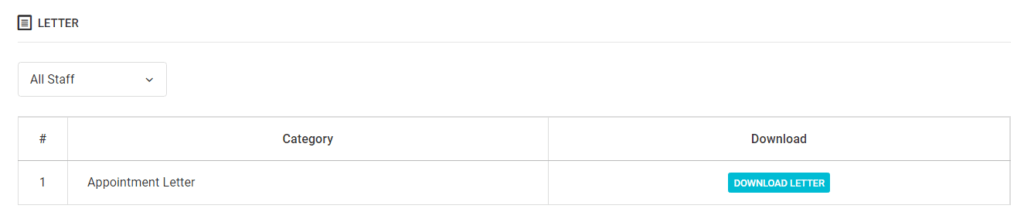
LETTER
Select an employee from the dropdown. Click on download letter to download personalised letter for selected employee.
Letter template can be created at Settings > Letter.
PAYROLL LOCK
Payroll lock is a compulsory step need to be taken every month after completing current month payroll. This will keep data safe from being accidentally overwritten by next month payroll processing.
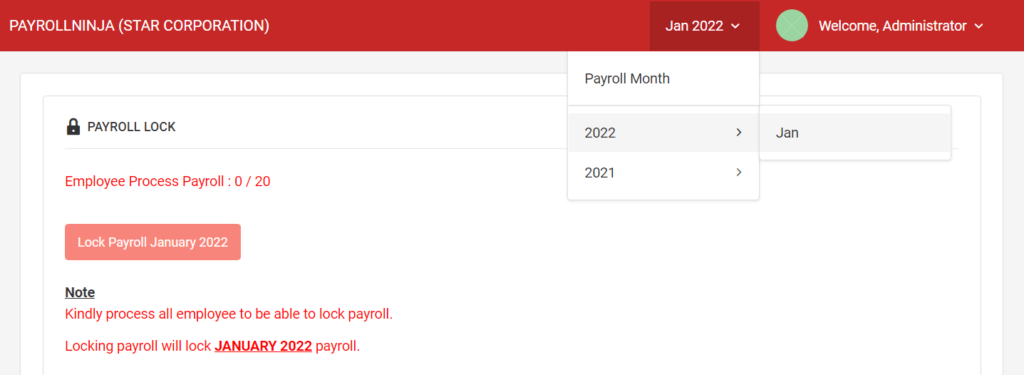
Payroll month for next month will be available only when current month payroll is locked. In order to lock payroll, all active/resigned employees of current month need to be process completely.
During payroll locking process, next month payroll will be auto computed and this will reduce the officer workload greatly up to 80%. Only employee with amendments need to be re-process next month.
ATTENDANCE
Attendance module should be used when your company uses fingerprint device to capture employee attendance. Prior to start using attendance module, please set Settings > Monthcycle based on your company payroll policy.
Then at Settings > Shift, you need to set all shift available in your company.
During signup, system already create default shift. However if you need to create other shift, you may do so.
Fill up name to identify. You need to set 1 week shift detail. Choose day type as “ND”, “OD” or “RD”.
- “ND” : normal days.
- “OD” : off days.
- “RD” : rest days.
Fill up shift in and shift out for day type “ND”. The time is written in the 24-hour time format. E.g, shift in 0900 and shift out 1800.
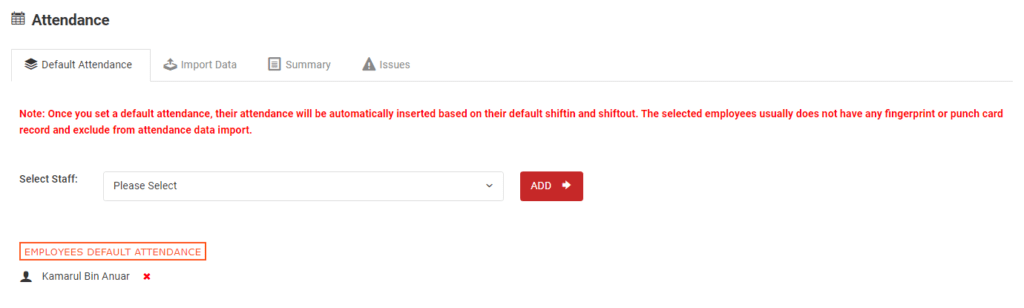
At default attendance, you may select employee who doesn’t require to scan their thumb at fingerprint device and click add. The choosen employee will be excluded from attendance data import. Their attendance will be automatically inserted based on their default shift in and shift out. E.g, company owner.
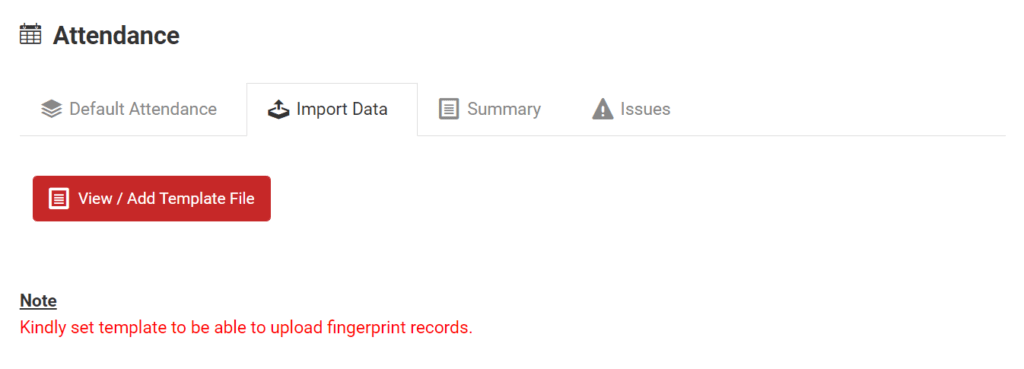
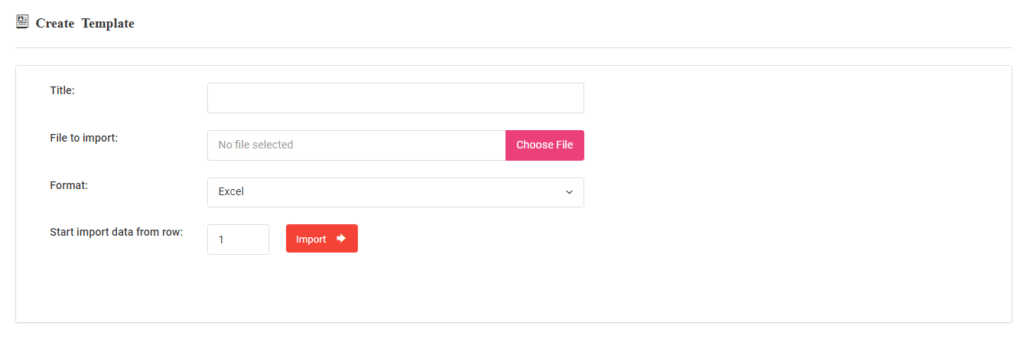
Next, we should set template file format. The template file will act as document example that already has some formatting. Click on the “View/Add Template file”, a popup will open. Then click on “Add new” button. It will display following form.
Each template will represent each unique fingerprint device model.
Key-in template title, upload sample file and choose the format of sample file. Only file format “.txt”, “.csv” and “.xlsx” are accepted at the moment.
If you would like to import data from row other than 1, please change accordingly and click on import button.
Next you need to match column on left with value on right. Then click on submit form.
Now the template is ready and you may continue to upload fingerprint file with same format.
The process to upload fingerprint file will take a long time depends on your file size.

After successfully importing file from fingerprint file, it will list employee attendance here.
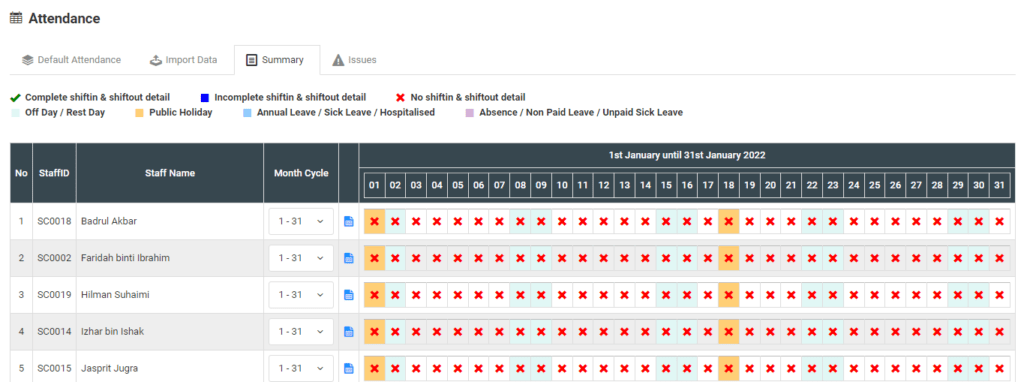
If need to change month cycle, please choose from the dropdown value and click on update month cycle at bottom.
Reminder: If employee month cycle are updated, their current month attendance will be erased. Please re-upload their attendance.
The cross shows that no record uploaded via fingerprint file. While tick shows record uploaded successfully. To view detailed monthly information, please click on blue sheet icon. A popup will be shown.
To view or edit each daily record, click the cross/tick icon at the selected date. A popup will be shown.
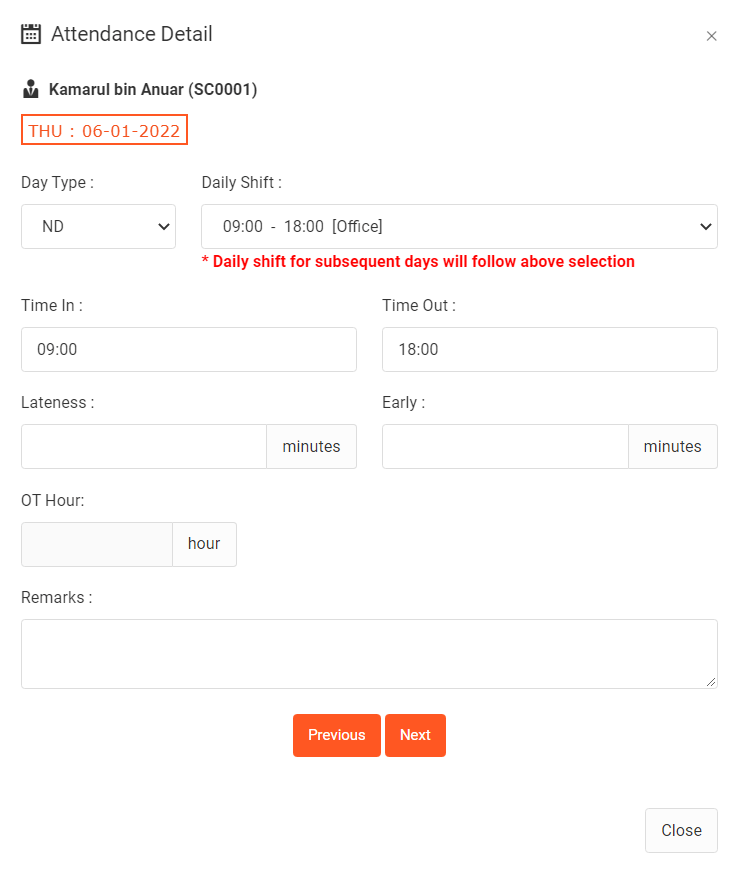
Daily attendance record can be edited here. The time in and time out is written in the 24-hour time format. E.g, time in 0900 and time out 1800.
Reminder: On change the daily shift, the subsequent days shift also will follow the same shift. Ot hour will be auto filled based on time in and time out input. Record will be saved automatically.
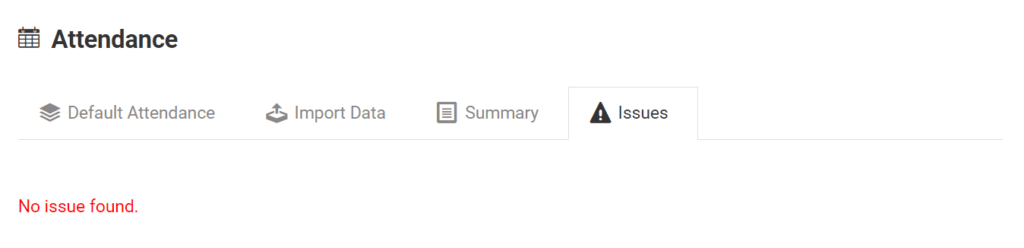
Issues is where incomplete value from fingerprint file will be shown. You may choose to ignore or fix it directly before upload.
It is recommended to fix all the issues in your attendance file and re-upload the file. Unsolved issue will be affected on payroll process.
DASHBOARD
This page will alert you about Leave Approval and Claim Approval. Every leave application from employee waiting to be approved will be shown here.

Others tab will show new employee record, basic pay, allowance waiting to be approve or reject.
Summary tab and comparison tab are mainly for User Type management use. At summary tab, the management can view statistical information of overall payroll reporting in graph. While at comparison tab, the management will be able to view comparison of last 3 months payroll performance.
At top right, the management can select the reporting to be narrow down by departments/projects.
In Conclusion
With all the features and benefits mentioned above, it is clear how the PayrollNinja system can be used easily and efficiently to take care of your payroll and HR needs. We offer all the standard benefits of an online payroll system, and then some.
So, have you started using PayrollNinja yet?
We are offering a 30-day trial – try PayrollNinja for FREE today!
Login to your PayrollNinja account.
So, what do you think about PayrollNinja? Tell us in the comments below.